EVIC home page
EVIC Update #11, December 15, 2001
Seasons greetings from Peterborough, Ontario, Canada.
The construction series in Strictly I.C. has come to an end as has, sadly, Strictly I.C. However the magazine series has given a boost to interest in the EVIC engine. Since Update #9 (which really was #10) went out in October I have sold several more copies of the EVIC book and 4 more electronics packages. I also supplied a programmed MICRO to one fellow who plans to make his own electronics. I know several of you have started building your own EVIC engines and I look forward to hearing about your success.
Not quite 10,000 RPM
In October I told you my goal was to push the EVIC to 10,000 RPM. I haven’t made it yet but I got close, 9470 RPM. Before reaching this speed I made changes to the electronics and the valve assemblies.
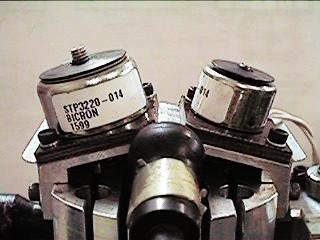
Better Solenoid Snubbers Lead to Faster Valve Closing
I replaced the 51 ohm resistors that speed the decay of the solenoid current when the power MOSFETS turn off with zener diodes (70 volts). This resulted in the valves closing slightly faster and boosted the top speed to over 9000 RPM. I then began experimenting with a higher solenoid voltage, 30 volts, and with damping pulses that limit the overshoot of the solenoid armatures when the valves are closing. The damping pulses increase the software complexity and resulted in a two micro configuration. The combination resulted in an increase in speed but the solenoids were getting very hot. As a result a decided to keep the damping pulses but to drop back to 24 volts and reduce the mass of the valves, valve springs and solenoid armatures.
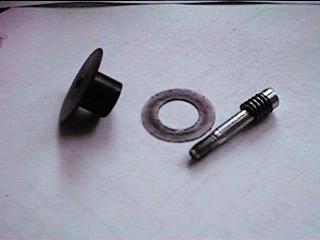
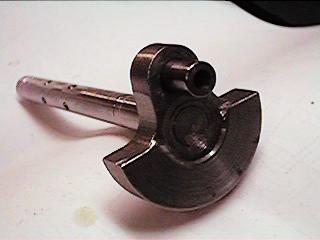
New Valve Assemblies
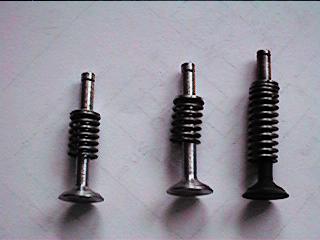
I made new valve assemblies that allowed me to cut the length of the valves stems by nearly 1/4", reduce the springs from 14 turns to 7, eliminate the separate valve adjusters and make aluminum shafts that thread into the steel part of the solenoid armatures. I also cut the weight of the steel part of the solenoid armatures by several grams. The leaf springs (solenoid return springs) used to limit the overshoot of the armatures when the valves close were replaced by coil springs that work with the damping pulses. These springs mount on the solenoid shafts and are compressed against the bottom of the solenoid body when the armature tries to overshoot.
The overall result was a 25% reduction in the weight of the moving parts. The down sides are that the valve lift adjustment is more difficult and the solenoid assembly has to be removed from the engine to adjust the solenoid return springs. The damping pulses were experimentally tuned to the mass of the new valve assemblies. The weight (mass) reduction had a positive effect and top speeds over 9400 RPM were reached during several tests. Details of the new valve assemblies are shown in the attached pictures. For those building, stick to the original design for now. If you wish, try reducing the length of the valve stems, making 7 turn valve springs and adjust the height of the solenoid mounting bracket accordingly.
Vibration
For some time I have been ignoring a rather severe vibration that set in above 8000 RPM. I now believe this vibration resulted from a very slight bend in the crankshaft in the area of the flywheel and from a lack of any effort on my part to balance the rotating and reciprocating masses of the engine. Balancing didn’t seem to be that important when I designed the engine since I didn’t expect the top speed to exceed 5000 RPM. During my high speed tests in November the engine began making a strange noise. Investigation showed this to be a result of the crankshaft slipping on the inner race of the front ball bearing. This slipping wore the diameter of the shaft down from 0.375" to under 0.368" and the flywheel began to hit the engine’s base causing the noise I was hearing. I couldn’t get the flywheel off so I ended up cutting the shaft and drilling the old one out of the flywheel.
A New Crankshaft Results in a Smoother Running Engine
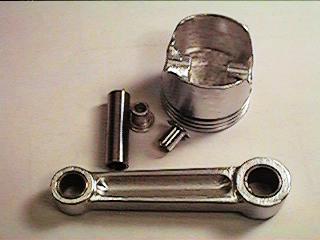
My original shaft was made out of ordinary mild steel. I believe this was a mistake. Because I milled slots in the shaft for the setscrews that hold the flywheel, the shaft was weak in this area. It may have become slightly bent during some of my earlier load tests when I was driving an automotive alternator with a belt that fit into the starter cord slot at the front of the flywheel. Since I ended up cutting the shaft I can’t prove this theory. However I made a new shaft from a stronger steel and a new crankshaft disk that balances the rotating and 1/2 the reciprocating masses. I followed the balancing guidelines in Volume 2 #11 and Volume 7 #41of Strictly I.C. To make the balancing easier I reduced the weight of the crank pin and piston pin by drilling them out and I reduced the weight of the rod and piston.
Then I marked the exact locations of the flywheel setscrews and milled narrower and shorter slots in the new shaft for them. Then I mounted the flywheel on the shaft, put it in a collet in my lathe and skimmed the flywheel down a few thou to make sure that when the setscrews were tightened it was concentric within a fraction of a thou. Only then did I assemble the new crank pin, crank disk and shaft. The result is a much smoother running engine especially at high speeds. Anyone building the engine should use a high strength steel for the shaft and consider making the balancing changes.
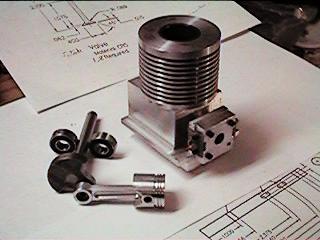
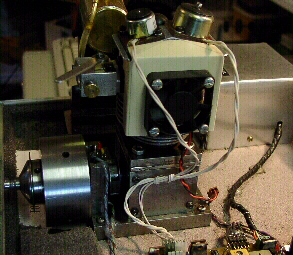
My Second EVIC Engine
I have a second engine partly built. See picture 2ndEVIC.jpg. It will have a slightly shorter stroke, 15/16", a cast iron cylinder liner and an aluminum crankcase. I plan to equip it with a third generation of valve assemblies. I am still working on this design. It may include 3 or 4 valves per cylinder and custom solenoids. It may use a Capacitive Discharge Ignition. The "Electronic Throttle" controller will plug directly into a servo connection on an R/C receiver to allow radio control of the engine’s power. I plan to demo this engine at NAMES 2002. You will be able to see my progress at Cabin Fever Expo.
Happy Holidays
Dave Bowes
Contact Info :
dbowes12@cogeco.ca